This post may contain affiliate links, meaning I may earn a small commission at no extra cost to you if you make a purchase through them. These commissions help support my blog and allow me to continue creating content. Thank you for your support!
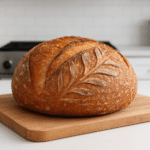
If you’ve ever dreamed of baking warm, crusty sourdough bread from scratch, it all begins with one magical ingredient — a sourdough starter. This bubbly mixture of flour and water is alive, constantly growing, and when cared for, it rewards you with loaves full of flavor, nutrition, and rustic beauty. Whether you’re brand-new to sourdough or simply looking to improve your starter routine, this guide will walk you step-by-step through the process with clarity and confidence.
What is a Sourdough Starter?
A sourdough starter is basically a leavening made from just two ingredients: flour and water. When these simple ingredients mix, they begin to ferment, attracting wild yeast and friendly bacteria from the environment. After a certain period of time, the mixture becomes ‘active’ and bubbly – with enough power to make bread rise withoug adding any commercial yeast.
This is what makes sourdough so special and satisfying to make. Instead of relying on packaged commercial yeast, your bread grows through a living culture that you created yourself. This is also why many people choose to name their sourdough starter. For many home bakers, a starter isn’t just a jar of flour and water — it’s a living culture that needs care, feeding, and attention, much like a pet or a houseplant. This is a good time to start choosing a name for your starter—after all, it’s about to become part of your kitchen family. Mine is named Bubulle, which means “bubble” in French in a cute, playful way.
Why Bake With a Sourdough Starter?
There are many reasons bakers fall in love with sourdough, but here are a few of the biggest:
- Incredible Flavor — tangy, rich, and complex.
- More Digestible — long fermentation breaks down gluten and phytic acid.
- Naturally Leavened — no commercial yeast needed.
- Longer Lasting Bread — stays soft for days thanks to natural acidity.
A healthy starter opens the door to endless homemade baking. Once it’s thriving, it becomes a lifelong kitchen companion.
What You Need to Get Started
You can certainly get fancy tools like a sourdough starter jar with silicone scraper but you can also use tools that your already have at home.
Ingredients
- Flour: unbleached all-purpose, whole wheat, or rye (rye is especially starter-friendly)
- Water: filtered or dechlorinated if possible for best results
Tools
- A glass jar or starter container
- Digital scale (recommended, but not required)
- Rubber band or marker for tracking growth, unless you’re using a starter container that already has built-in measurement markings.
- Spatula or spoon
You can also go ahead and purchase a sourdough starter kit if you feel you’re missing most of the tools needed to make your starter and bread, or if buying everything separately would be too expensive. The kit linked above contains almost everything you need to make your sourdough starter and bread, except for a Dutch oven or bread pan, and a digital scale.
Optional upgrades: vented or cloth-covered lid, silicone jar band, or a dedicated starter jar — but a simple container works perfectly.
How to Make your Own Starter (Day-by-Day Guide)
One of the most important things to remember when making your own sourdough starter is to be patient. Creating a starter can take a week or more. My first one took even longer, and I was close to giving up when I decided to start feeding it with whole wheat flour. That made a huge difference — after that, my starter became active and ready to use in no time.
Day 1:
- Mix equal parts flour + water in a jar. A good quantity to start with is 4 tablespoons of flour (40 g) and 4 tablespoons of water (60 g).
- Stir until the mixture resembles a thick pancake batter.
- Cover loosely with a lid or cloth and let it sit at room temperature.
Day 2-3:
- After 24 hours, discard half of your starter and feed it with fresh flour and water in a 1:1 ratio. You can use the same quantities as on Day 1.
- By Day 3, you may notice small bubbles forming along with a subtle, tangy aroma.
Day 4-5
- If your starter is active (you are seeing bubbles), start feeding it twice a day, every 12 hours. Always discard half of your starter before feeding. If your starter is not active yet, wait another day before moving to twice-daily feedings.
- Your starter should become airy and begin to rise and fall consistently.
Do this test: Drop a spoonful of starter in water. If it floats, it’s active enough to bake with.
If it doesn’t float, continue feeding it twice a day. Make sure your jar is in a warm place — not in front of an air conditioner, for example.
Day 6+:
- Keep on feeding once a day (twice if it’s super active).
- Look for lots of bubbles, a pleasant, tangy smell and doubling in size within 4 to 6 hours.
Congrats, you now have a living, breathing sourdough starter.
Feeding, Storage & Long-Term Care
Once your starter is thriving, you have to keep it alive.
If you bake often – 3 or more times per week:
Feed daily, always discard half before feeding. Keep at room temperature
If you bake occasionally – once per week or less:
Store your starter in the fridge and feed it once a week. Before baking, take the starter out of the fridge, bring it to room temperature, and feed it. It may take a couple of feedings to fully reactivate.
A layer of dark liquid, called hooch, can form on your starter if it stays in the fridge for a long time without being fed. This is a sign that it’s hungry. Simply stir the hooch back into the starter and feed it. If the starter smells very sour, multiple feedings may be needed to refresh it.
5 Common Mistakes to Avoid
- Using chlorinated water: Chlorine will harm your natural yeast and make the process slower.
- Keeping you starter in a cool or cold place: Yeast thrives better at temperatures between 21–24°C (70–75°F).
- Not discarding before feeding: Discarding helps keep the yeast and bacteria balanced, controls acidity, and prevents the starter from becoming unmanageably large. Don’t worry — you can store the discarded starter in the fridge and use it in various recipes. I’ll be sharing some of these recipes on this blog soon.
- Inconsistent feeding: Your starter needs regular food to grow. If feedings are skipped or irregular, yeast activity stalls, and your starter may sour or separate.
- Using the wrong type of flour for early development: ome flours ferment better than others. All-purpose flour works, but whole wheat or rye can jump-start fermentation due to their higher nutrient content.
Final Thoughts – You’re Growing Something Beautiful
Creating your own sourdough starter is both empowering and rewarding. It teaches patience, observation, and the joy of nurturing something alive. Your starter will evolve with time, and so will your baking skills. Don’t be discouraged by small setbacks — every bubbly jar has its own personality, and the more you care for it, the better it becomes.
Now you’re ready to bake your first loaf, feed your starter with confidence, and step fully into the world of sourdough baking. Let the adventure begin!
Your can check out my Easy Homemade Sourdough Bread Recipe and bake your very first sourdough loaf. The recipe is towards the end of the article.